<?xml version="1.0" encoding="utf-8"?>
<mx:Application xmlns:mx="http://www.adobe.com/2006/mxml" layout="absolute" creationComplete="prepareBridge()">
<mx:VBox horizontalAlign="center">
<mx:Button
label="Load Youtube"
click="load()"
height="10%" width="130"/>
<mx:Box
id="panel"
width = "100%"
height = "90%"/>
</mx:VBox>
<mx:Script>
<![CDATA[
import mx.controls.SWFLoader;
private var counter:Number = 0;
private var outBox:LocalConnection;
private var outBoxName:String;
private function load():void {
outBox.send(outBoxName, "dispose");
outBox.send(outBoxName, "loadMovie", "hZ9VHzTMwr8");
}
private function prepareBridge():void {
outBox = new LocalConnection();
outBox.addEventListener(StatusEvent.STATUS, function(event:StatusEvent):void {
switch (event.level) {
case "status":
trace("LocalConnection.send succeeded");
break;
case "error":
trace("LocalConnection.send failed");
break;
}
});
var swfLoader:SWFLoader = new SWFLoader();
swfLoader.addEventListener(Event.COMPLETE, onInitialize);
swfLoader.addEventListener(flash.events.IOErrorEvent.IO_ERROR , onLoaderIoError);
swfLoader.autoLoad = true;
swfLoader.percentWidth = 100;
swfLoader.percentHeight = 100;
swfLoader.scaleContent = true;
swfLoader.maintainAspectRatio = true;
outBoxName = String(new Date().getUTCMilliseconds());
swfLoader.load("youtubebridge.swf?boxName=" + outBoxName);
panel.addChild(swfLoader);
}
private function onInitialize(event:Event):void {
}
private function onLoaderIoError(event:IOErrorEvent):void {
trace( 'onLoaderIoError: ' + event );
}
]]>
</mx:Script>
</mx:Application>
Two more file to be included in the working directory
youtubebridge.fla
youtubebridge.swf

Showing posts with label tutorial. Show all posts
Showing posts with label tutorial. Show all posts
Wednesday, April 29, 2009
Sunday, March 15, 2009
How to play mp3 from Flex
<?xml version="1.0" encoding="utf-8"?><mx:Application xmlns:mx="http://www.adobe.com/2006/mxml" layout="absolute" >
<mx:Button x="221" y="181" label="Play" width="99" height="26" click="playSound()"/> <mx:Button x="221" y="281" label="Stop" width="99" height="26" click="stopSound()"/> <mx:Script>
<![CDATA[
import flash.trace.Trace;
import mx.core.SoundAsset;
import flash.media.*;
import mx.controls.Alert;
[Embed(source="media/KissfromaRose.mp3")]
[Bindable] public var Song:Class;
public var mySong:SoundAsset = new Song() as SoundAsset;
public var channel:SoundChannel;
public function playSound():void {
// Make sure we don't get multiple songs playing at the same time
stopSound();
// Play the song on the channel channel = mySong.play();
}
public function stopSound():void {
// Stop the channel, but only if it exists
if ( channel != null )
channel.stop();
}
]]>
</mx:Script>
</mx:Application>
How to call Webservice from flex
<![CDATA[
import mx.rpc.events.FaultEvent;
import mx.managers.CursorManager;
import flash.trace.Trace;
import mx.controls.Alert;
import mx.rpc.events.ResultEvent;
import mx.rpc.soap.WebService;
private function callSOAP():void{
var service:WebService = new WebService();
service.wsdl = "http://localhost:8080/webproject/services/UserLogin?wsdl";
service.getUserdetails.addEventListener("result",userDetailsResultfunction);
service.loadWSDL();
service.getUserdetails("argument1","argument2");
}
private function userDetailsResultfunction(event:ResultEvent):void{
var xmlResult:XML;
xmlResult = XML(event.result);
Alert.show("Result : " + xmlResult.toString());
}
]]>
Monday, February 9, 2009
Flex Basic components - source code
How to use Basic components, like button, combo box, grid, MessageBox(Alert Box), Radio Button, CheckBox, Text Box etc in Adobe Flex.
<?xml version="1.0" encoding="utf-8"?>
<mx:Application xmlns:mx="http://www.adobe.com/2006/mxml" layout="absolute" width="632" height="291" creationComplete="init()">
<mx:Button x="479" y="25" label="Add to Grid" click="btn_Click()"/>
<mx:CheckBox x="37" y="36" id="chk_box" label="Checkbox" click="checkbox_Click()"/>
<mx:ComboBox x="267" y="25" width="189" id="combo_id" prompt="select">
<mx:dataProvider>
<mx:String>data 1</mx:String>
<mx:String>data 2</mx:String>
<mx:String>data 3</mx:String>
<mx:String>data 4</mx:String>
<mx:String>data 5</mx:String>
<mx:String>data 6</mx:String>
<mx:String>data 7</mx:String>
<mx:String>data 8</mx:String>
<mx:String>data 9</mx:String>
<mx:String>data 10</mx:String>
</mx:dataProvider>
</mx:ComboBox>
<mx:RadioButtonGroup id="radiogroup1" change="radiobtn_Click()"/>
<mx:RadioButton x="37" y="66" label="Button 1" groupName="radiogroup1"/>
<mx:RadioButton x="37" y="92" label="Button 2" groupName="radiogroup1"/>
<mx:ProgressBar x="267" y="213" width="247" id="prg_id"/>
<mx:TextInput x="37" y="122" id="text_id" change="{label_id.text ='InputBox Value =' + text_id.text}"/>
<mx:DataGrid x="267" y="54" id="datagrid1">
<mx:columns>
<mx:DataGridColumn headerText="Column 1" dataField="slno"/>
<mx:DataGridColumn headerText="Column 2" dataField="cdata"/>
</mx:columns>
</mx:DataGrid>
<mx:Label x="37" y="152" text="Input box value" id="label_id"/>
<mx:Script>
<![CDATA[
import mx.messaging.messages.ErrorMessage;
import mx.collections.ArrayCollection;
import mx.controls.List;
public var arr:ArrayCollection=new ArrayCollection();
private var i:int;
import mx.controls.Alert;
private function init():void{
i=0;
prg_id.maximum=10;
}
private function checkbox_Click():void{
//if(chk_box.selected
Alert.show("Check box " + chk_box.selected);
}
private function radiobtn_Click():void{
Alert.show(" Radio " + radiogroup1.selectedValue + "selected");
}
private function btn_Click():void{
if(combo_id.selectedIndex==-1)
Alert.show("Please select a value from ComboBox" , "Flex Tutorial");
else{
var obj:Object=new Object();
Alert.show(combo_id.selectedItem.toString());
obj.cdata=combo_id.selectedItem;
obj.slno=i;
arr.addItem(obj);
datagrid1.dataProvider=arr;
prg_id.setProgress(i,10);
if(i < 11)
i++;
}
}
]]>
</mx:Script>
</mx:Application>
Output File
Monday, February 2, 2009
How to Start First Flex Application
Before starting the first program
Install latest JDK and Tomcat/Jboss Server
Install the Eclipse open source
Install flex 3 builders or Flex plug-in for eclipse
add flex plug-in to eclipse
Open eclipse
Select Help>>software updates>>Find and install
Select "Search for new features to install" proceed to next
click on "New local site" and select the Flex 3 plug-in path
eg:"X:\Program Files\Adobe\Flex Builder 3 Plug-in\com.adobe.flexbuilder.update.site"
goto file and create new "Flex project" name the project "Helloworld"
now a new file will be created
Helloworld.mxml
the file contain the following code
<?xml version="1.0" encoding="utf-8"?>
<mx:Application xmlns:mx="http://www.adobe.com/2006/mxml" layout="absolute">
</mx:Application>
goto "Design" mode
insert button to the project , then click on "source" mode
now the code is
<?xml version="1.0" encoding="utf-8"?>
<mx:Application xmlns:mx="http://www.adobe.com/2006/mxml" layout="absolute">
<mx:Button x="382" y="148" label="Button"/>
</mx:Application>
Create an id for the button and change its caption
and then add a function to the button, now the code become
<?xml version="1.0" encoding="utf-8"?>
<mx:Application xmlns:mx="http://www.adobe.com/2006/mxml" layout="absolute">
<mx:Button x="382" y="148" label="Click me" id="btn" click="clickedme()"/>
<mx:Script>
<![CDATA[
import mx.controls.Alert;
private function clickme():void{
Alert.show("Hello world");
}
]]>
</mx:Script>
</mx:Application>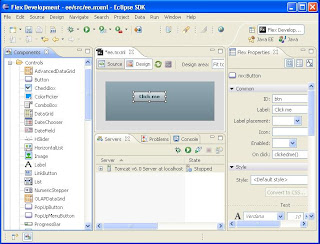
now your first project is finished
to build the project, goto Project>>build Project
to run the project, goto Run>>Run as>> Flex Application
Install latest JDK and Tomcat/Jboss Server
Install the Eclipse open source
Install flex 3 builders or Flex plug-in for eclipse
add flex plug-in to eclipse
Open eclipse
Select Help>>software updates>>Find and install
Select "Search for new features to install" proceed to next
click on "New local site" and select the Flex 3 plug-in path
eg:"X:\Program Files\Adobe\Flex Builder 3 Plug-in\com.adobe.flexbuilder.update.site"
goto file and create new "Flex project" name the project "Helloworld"
now a new file will be created
Helloworld.mxml
the file contain the following code
<?xml version="1.0" encoding="utf-8"?>
<mx:Application xmlns:mx="http://www.adobe.com/2006/mxml" layout="absolute">
</mx:Application>
goto "Design" mode
insert button to the project , then click on "source" mode
now the code is
<?xml version="1.0" encoding="utf-8"?>
<mx:Application xmlns:mx="http://www.adobe.com/2006/mxml" layout="absolute">
<mx:Button x="382" y="148" label="Button"/>
</mx:Application>
Create an id for the button and change its caption
and then add a function to the button, now the code become
<?xml version="1.0" encoding="utf-8"?>
<mx:Application xmlns:mx="http://www.adobe.com/2006/mxml" layout="absolute">
<mx:Button x="382" y="148" label="Click me" id="btn" click="clickedme()"/>
<mx:Script>
<![CDATA[
import mx.controls.Alert;
private function clickme():void{
Alert.show("Hello world");
}
]]>
</mx:Script>
</mx:Application>

now your first project is finished
to build the project, goto Project>>build Project
to run the project, goto Run>>Run as>> Flex Application
Subscribe to:
Posts (Atom)